
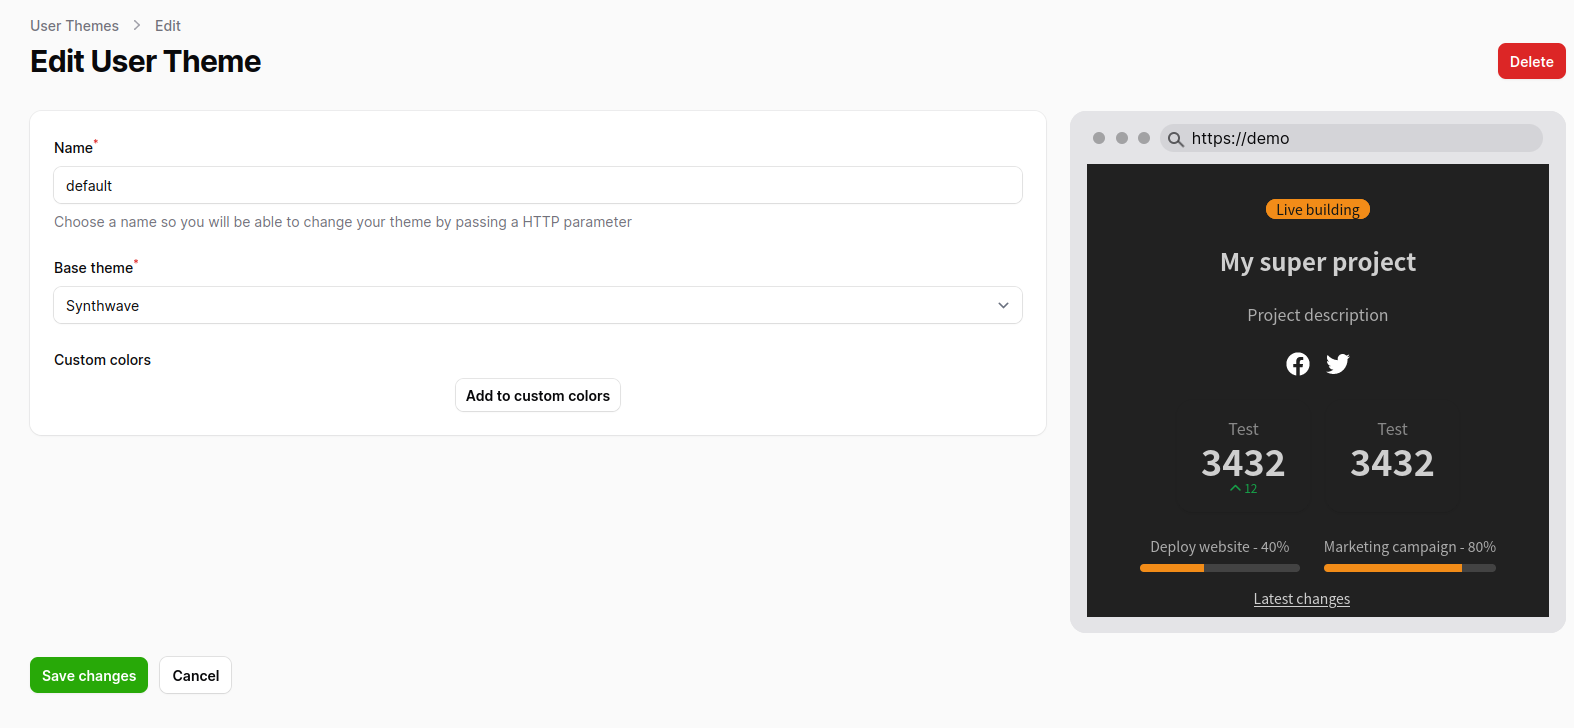
It’s relatively a common feature to let the user to select a theme. And for this, a “live-preview” is always easier for your end-users to choose the template they like.
To do it with Filament v3, I followed the steps below. But first, have a look on the end-result.
1. Creating a ViewField component
A ViewField component is enough to do this. Before creating it, just add the live() method to the form component you want to be reactive. Here, this is the dropdown allowing the user to select the theme.
Select::make('theme_id')
   ->label('Base theme')
   ->required()
   ->live()
   ->options(Theme::pluck('name', 'id')),
Then we can create a Blade file called “preview.blade.php” in the resources/views/filament/forms/components/ folder.
The code is as follows:
<div class="mockup-browser border">
    <div class="mockup-browser-toolbar">
        <div class="input">https://demo</div>
    </div>
    @php
        $themeId = $evaluate(fn ($get) => $get('theme_id'));
        $themeSlug = App\Model\Theme::findOrFail($themeId)->slug;
    @endphp
    <div class="flex justify-center px-4 py-16 bg-base-200">
        <iframe id="iframe_preview" style="width: 100%; padding-bottom: 15px" src="http://{{ $url }}:8001?iframe=1&base_theme={{ $themeSlug }}"></iframe>
    </div>
</div>
@vite('resources/themes/mockup.scss')
First, you will notice the line
$themeId = $evaluate(fn ($get) => $get('theme_id'));I grabbed that in the documentation of Filament v2, in the tricks section.
The good thing is that the $themeId variable is now reactive in your Blade template: each time the user is changing the “base_theme” value, even without saving, the $themeId will be changed accordingly.
Next, we retrieve the information of the theme. As we got an ID, we need the theme’s slug, but it’s optional, it depends of the requirements of your project.
$themeSlug = App\Models\Theme::findOrFail($themeId)->slug;Here, $themeSlug is still reactive. Each time the user selects a different theme, a database request will be made and the slug will be updated.
Finally, we load our demo page thanks to an iframe, passing the $themeSlug in parameter.
<iframe id="iframe_preview" style="width: 100%; padding-bottom: 15px" src="http://{{ $url }}:8001?iframe=1&base_theme={{ $themeSlug }}"></iframe>
The good news is that the iframe will refresh itself each time the $themeSlug value changes. So you have almost nothing to do here, you don’t have to refresh manually the iframe!
2. The Livewire component
To load the iframe content with the selected theme, we passed the theme slug through a GET parameter.
In your Livewire v3 page, you can intereact with this parameter easily:
#[Url(as: 'base_theme')]
public string $queryBaseTheme = '';
I strongly recommend to name all your Livewire URL public properties by prefixing them by “query”. I think it’s a good convention.
The remaining thing to do is easy. We need to query the right theme, and grab all properties needed to display the iframe page correctly.
It’s done with a Computed propery.
#[Computed]
public function theme(): array
{
   return [
       (...)
      'base_theme' => ($this->queryBaseTheme !== '' && Theme::firstWhere('slug', $this->queryBaseTheme))
                ? $this->queryBaseTheme
                : $activeTheme->theme->slug,


   ];
}
This line means basically: if there is a GET parameter, the corresponding theme is loaded. Otherwise, we load the current active theme.
Once it’s done, you just have to apply the theme client-side, and that’s it!
Let me know if you have any question!
Leave a Reply